Hardware Installation
Step-by-step installation of the camera, projector, mini PC and accessories — mount heights by table size, mounting options for different ceilings, and the full wiring diagram.
This page takes you from boxes on the floor to a rig that is ready to calibrate. Plan on two to four hours the first time, most of it on a ladder. If you have not bought the gear yet, start with Hardware You Need.
Watch it first — the Get Started page has a start-to-finish setup video (Watch Setup Video). Seeing the finished rig once makes every step below faster.
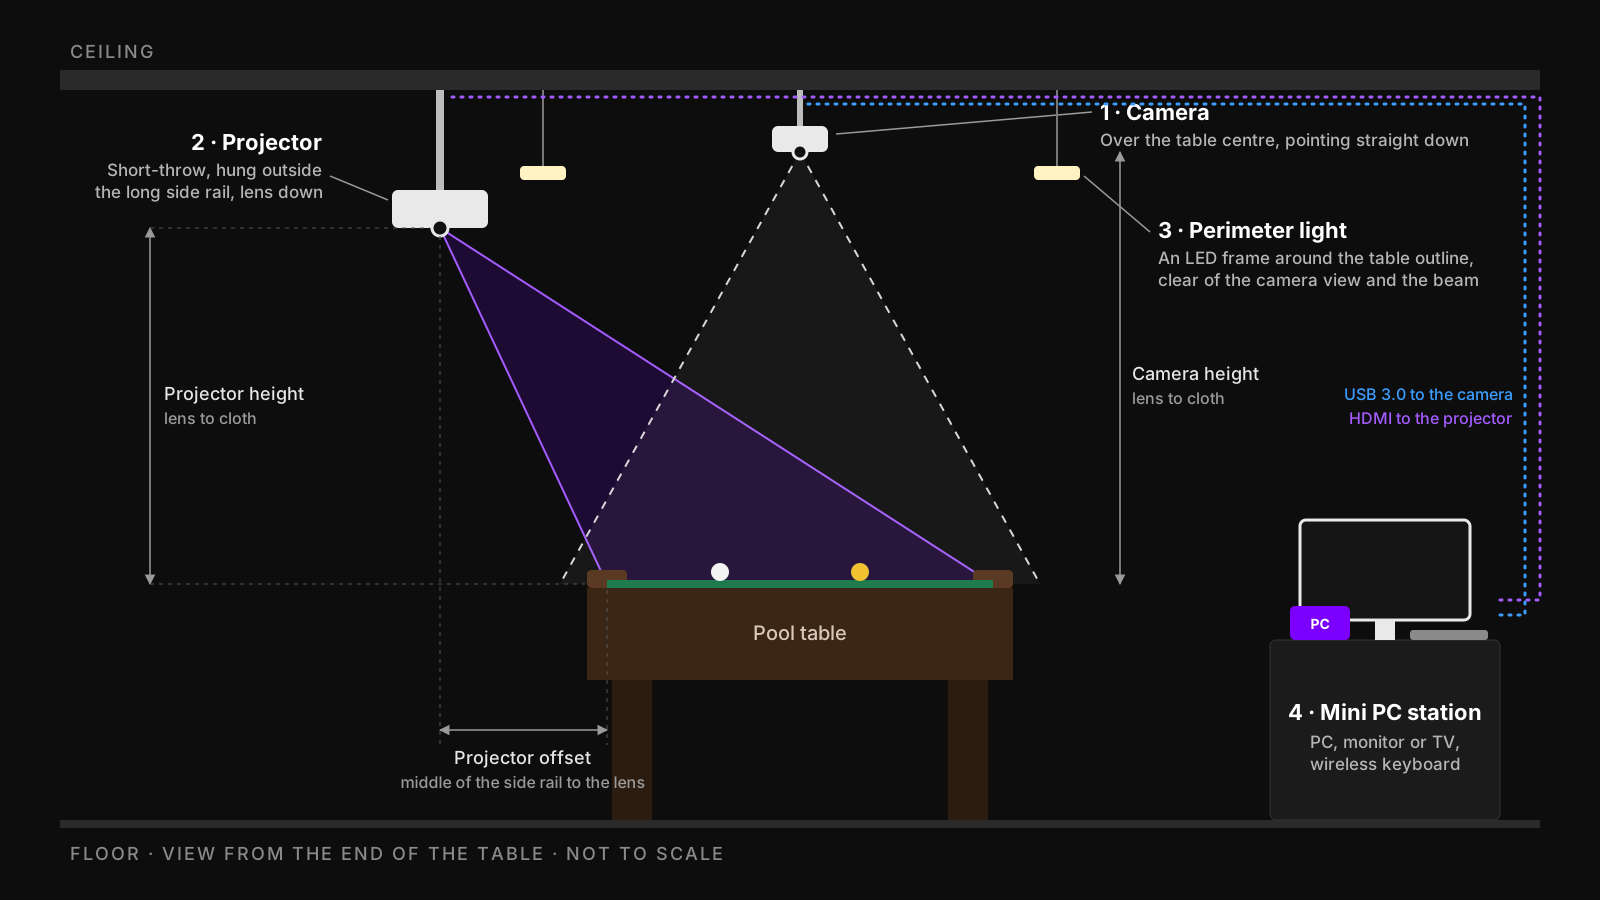 What you are building. The three measurements — camera height, projector height and projector offset — are all taken from the cloth and the side rail.
Before you start
Tools
- Tape measure, pencil and painter's tape
- Plumb bob (or a weight on a string) or a laser level
- Stud finder
- Drill, bits and a screwdriver
- Ladder, and a second person for the projector
- Cable clips or paintable cable raceway
- A short safety cable or tether for the projector
Safety
- Anchor overhead mounts into framing or properly rated structural hardware — never into bare drywall, plaster or a ceiling-tile grid.
- Stay below every mount's listed weight limit, and add a safety tether to the projector.
- Test active and directional cables on the floor before you route them through a ceiling or wall.
- If you are not comfortable working overhead or finding structure, hire a handyman for the two mounts. It is a one-hour job for someone equipped.
Mount heights by table size
All heights are from the cloth to the lens. The projector figures are for the ViewSonic PS502W; other short-throw projectors land close to them, and the 3D room configurator gives the exact numbers for any model.
| Table | MX Brio camera height | H110 camera height | Projector height | Projector offset |
|---|---|---|---|---|
| 6 ft | 43 in (108 cm) | 33 in (84 cm) | 38 in (96 cm) | 17.3 in (44 cm) |
| 7 ft | 49 in (125 cm) | 37 in (94 cm) | 44 in (111 cm) | 19.9 in (51 cm) |
| 8 ft | 55 in (140 cm) | 40 in (102 cm) | 49 in (125 cm) | 22.1 in (56 cm) |
| 9 ft | 62 in (157 cm) | 44 in (112 cm) | 55 in (140 cm) | 2 ft 1 in (63 cm) |
| 10 ft | 69 in (175 cm) | 48 in (121 cm) | 61 in (156 cm) | 2 ft 3 in (69 cm) |
- Camera height is the lowest the lens can sit and still see the whole table and every pocket. Both cameras' figures are measured over an 8 ft table — the MX Brio at 55 in (its 90° setting), the H110 at 40 in — and the other sizes are scaled from them. Higher is fine — balls just get smaller in the picture (aim for 20+ pixels per ball; Get Started shows the figure for your room).
- Projector height is the lens-to-cloth distance at which the picture covers the table with a little spare.
- Projector offset is how far outside the long side rail the lens sits — measured from the middle of the rail to the lens, straight out, level with the middle of the table's length.
These are the same figures Setup help gives you inside the app.
Step 1 — Plan the layout
- Find the centre of the table. Run two strings corner pocket to corner pocket; they cross at the centre. Mark it with a coin or a ball.
- Transfer the centre to the ceiling. Hold a plumb bob from the ceiling until it hangs over your mark (or use a laser level), and put painter's tape on the ceiling. This is the camera point.
- Choose the projector side. The projector goes outside one long rail. Pick the side that is out of the walkway, clear of the room's main doorway sightline, and closer to where the PC will live.
- Mark the projector point. From the middle of that side rail, measure the projector offset straight out from the table, then plumb up to the ceiling and tape it.
- Check both points for obstructions — light fixtures, ceiling fans, ducts, beams, sprinkler heads. Anything that hangs into the camera's view or the projector's beam has to move, or the mount point does.
- Find the structure. Run the stud finder around both tape marks and note where the joists are. That decides your mounting method in Step 2.
Step 2 — Pick a mounting method for your ceiling
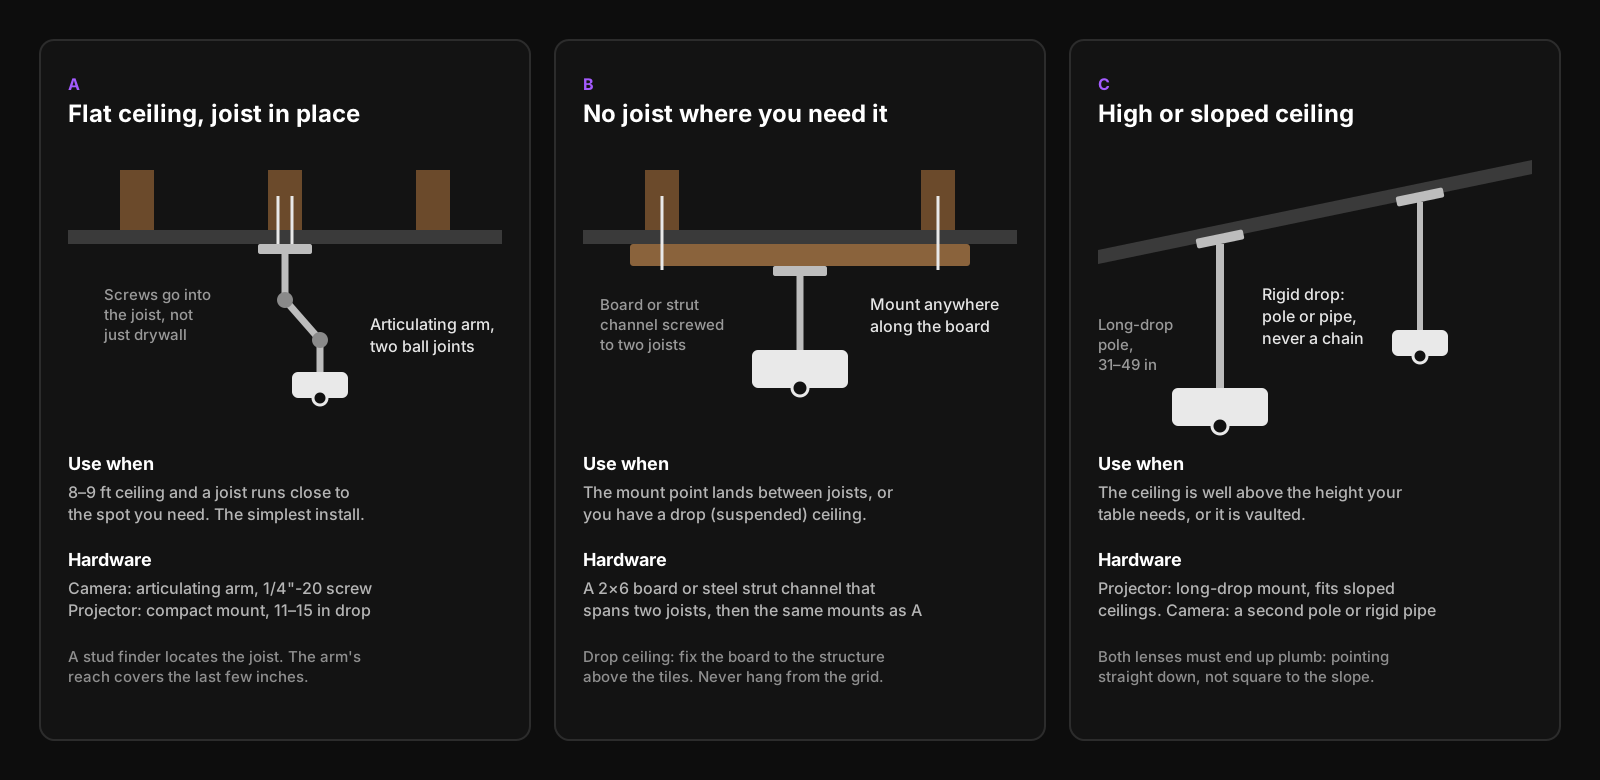 A when a joist is where you need it, B when it is not, C when the ceiling is high or sloped.
A — Flat ceiling with a joist in the right place
The simplest install. Screw the camera arm's base plate and the projector mount directly into the joist. The arm's two ball joints and the projector mount's slotted plate cover the last few inches of error.
B — No joist where you need it
Very common, because the camera point is fixed by the table, not by your framing. Screw a 2×6 board or a length of steel strut channel across two joists, then mount to it anywhere along its length. Paint it to match the ceiling and it disappears.
Drop (suspended) ceilings — never hang from the tile grid. Remove a tile, fix the board or strut to the structure above, and pass the pole or arm down through a hole in the tile.
C — High, vaulted or sloped ceiling
The lenses still need to end up at the heights in the table above, so both devices come down on rigid drops.
- Projector — a long-drop mount (the suptek PR05LW adjusts from 31 to 49 in and installs on flat or sloped ceilings).
- Camera — a second projector pole or a rigid pipe with a 1/4"-20 camera plate at the bottom. Never a chain, cable or anything that can swing: the camera must not move between calibration and play.
On a slope, both lenses must end up plumb — pointing straight down, not square to the ceiling.
Low ceilings (7 to 8 ft, basements)
You have the opposite problem: not enough height. Use the most compact mounts you can, keep the projector body tight to the ceiling, and check the clearance table in Hardware You Need. A wide-angle camera is what makes a low ceiling work; the H110 pick exists for this case — it frames an 8 ft table from 40 in above the cloth.
Concrete ceilings
Use sleeve or wedge anchors rated well above the load, and the same mounts. A short length of strut channel anchored at two points gives you adjustment along its length after the holes are drilled.
Cannot drill at all?
Tell us about the room before you buy anything — share photos in Discord. There are workable answers, but they depend on the space, and we would rather plan it with you than have you guess.
Step 3 — Mount the camera
- Fix the arm's base at (or within arm's reach of) the camera point.
- Thread the camera onto the arm. Both recommended arms fit the MX Brio's 1/4"-20 socket directly; the ELP camera uses its own included yoke.
- Set the lens at your camera height from the table above, directly over the table centre. Re-check with the plumb bob from the lens.
- Point it straight down and square it to the table: the long edge of the picture should run along the long side of the table.
- Tighten every joint hard. A camera that droops a few millimetres a week slowly breaks calibration. If a ball joint will not hold, that arm is too light — use the heavier one.
- Open the privacy shutter if the camera has one.
- Leave the cable hanging for now; you will route it in Step 6.
Measure the final cloth-to-lens height and write it down — FusionCue asks for it later.
Step 4 — Mount the projector
- Fix the ceiling mount at the projector point from Step 1.
- Attach the mount's plate to the projector's threaded mounting holes on the floor, where you can see what you are doing.
- Set the mount's drop so the lens ends up at your projector height.
- With a helper, lift the projector onto the mount and lock it.
- Aim it lens down, toward the floor. A short-throw projector throws its picture off to one side of the lens rather than straight ahead; turn the projector so that side faces the table. If the picture lands away from the table, rotate the projector 180° on its pole.
- Attach the safety tether to structure, not to the mount.
- Check your projector's manual for the mounting orientations it allows and keep its vents clear — it needs free air on the intake and exhaust sides.
Do not chase a perfect picture yet. You only need the image to cover the whole cloth with a little spare past every rail; calibration does the precise fit, and FusionCue can rotate or un-mirror the picture in software.
Picture too small to cover the table? The projector needs to go higher (more lens-to-cloth distance), not further away sideways. If the ceiling will not allow it, that projector's throw ratio is too long for your room.
Step 5 — Place the mini PC
The PC can live anywhere within cable reach of the camera and projector — typically 15 to 50 ft of cable once you route up a wall and across the ceiling.
Where to put a mini PC
- Behind the TV or monitor. Many mini PCs include a VESA bracket that bolts to the back of the screen. The PC disappears and the video cable is a foot long.
- On a shelf or in a cabinet near the table, with the door or back open enough for airflow.
- Up high, near the ceiling mounts, on a small wall shelf. This keeps the camera and projector cables short enough to skip the active extensions, at the cost of a longer run to your screen.
Rules of thumb
- Airflow — a mini PC working hard needs free air on every vent. Not in a sealed drawer, not on carpet.
- Reach the power button and at least one spare USB port.
- Keep it off the table and rails. Vibration and chalk dust are both bad for it.
- A desktop tower follows the same rules; it just needs floor or cabinet space.
Step 6 — Run the cables
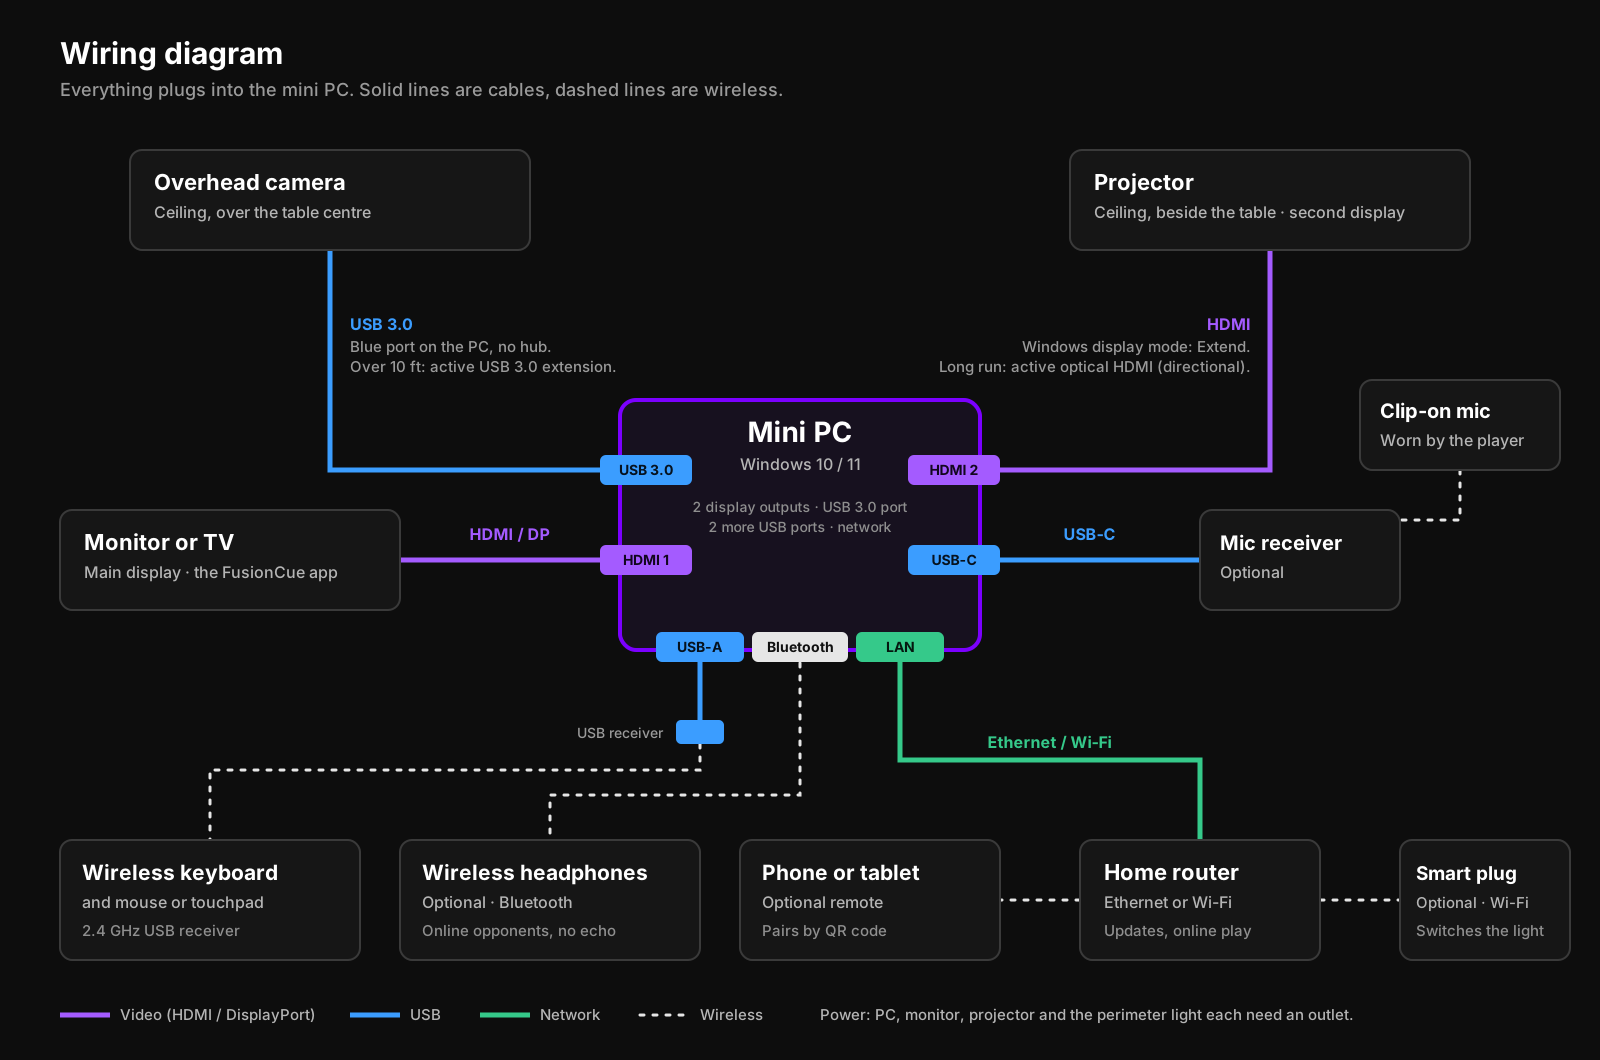 Every connection to and from the mini PC. Solid lines are cables; dashed lines are wireless.
Connections
| From | To the PC | Cable | Notes |
|---|---|---|---|
| Overhead camera | Blue USB 3.0 port on the back | The camera's own cable, plus an active USB 3.0 extension beyond about 10 ft | No hub, no passive extension |
| Projector | HDMI (second output) | HDMI; active optical HDMI for long runs | Directional: "Source" end at the PC, "Display" end at the projector |
| Monitor or TV | HDMI or DisplayPort (first output) | Any | This is the main display |
| Wireless mic receiver | USB-C | None — it plugs straight in | Optional |
| Keyboard and mouse | USB-A (2.4 GHz receiver) or Bluetooth | — | |
| Wireless headphones | Bluetooth | — | Optional |
| Router | Ethernet or Wi-Fi | — | Ethernet is steadier for online matches and streaming |
| Smart plug | — | — | Optional. Joins your Wi-Fi; FusionCue reaches it over the local network |
Routing
- Test everything on the floor first. Lay the full cable run out, plug it in, and confirm you get a camera picture and a projected desktop before a single clip goes on the wall.
- Mind the direction of optical HDMI. The ends are labelled. Installed backwards it simply does not work — and you will not find out until it is inside the ceiling.
- Route up the wall nearest the PC, across the ceiling, and drop to each device. Cable raceway painted to match looks finished; clips are fine.
- Leave a service loop at the camera and the projector so neither cable pulls on its connector when the mount is adjusted.
- Power the far end of an active USB extension if it came with a power adapter.
- Power — the projector needs an outlet near the ceiling (or a tidy extension run). The PC, screen and perimeter light each need one too. A surge protector at the PC station is cheap insurance.
Step 7 — Light the table
Install or hang the perimeter light around the table's outline, at the same height on every side, and confirm by eye that no part of it appears in the camera's view or the projector's beam. Remove or relocate any traditional pool light hanging over the middle of the table.
If you are using a smart plug, plug the light into it now and follow Smart Light after FusionCue is installed.
Step 8 — Power on and check
- Turn on the projector and the PC. If the projector says No Signal, use its remote to choose the HDMI input you used (the button is usually Source or Input).
- Extend the desktop. Hold the Windows key and tap P, then choose Extend. Your monitor stays the main screen; the projector becomes a second one. Your mouse can now wander onto the table — move it back.
- Install FusionCue and sign in — see Installation.
- Open Settings → Hardware:
- Active camera — choose the overhead camera. It should read Ready at 1920×1080 and 30 or 60 FPS.
- Projector display — choose the projector.
- Camera height above the felt — enter the cloth-to-lens height you measured in Step 3, or leave it on auto.
- Microphone — choose your wireless mic, if you have one.
- Look at the table. The projected picture should cover the whole cloth with a little spare, and text should read the right way round. If it is upside-down or mirrored, fix it in the app — no need to touch the mount.
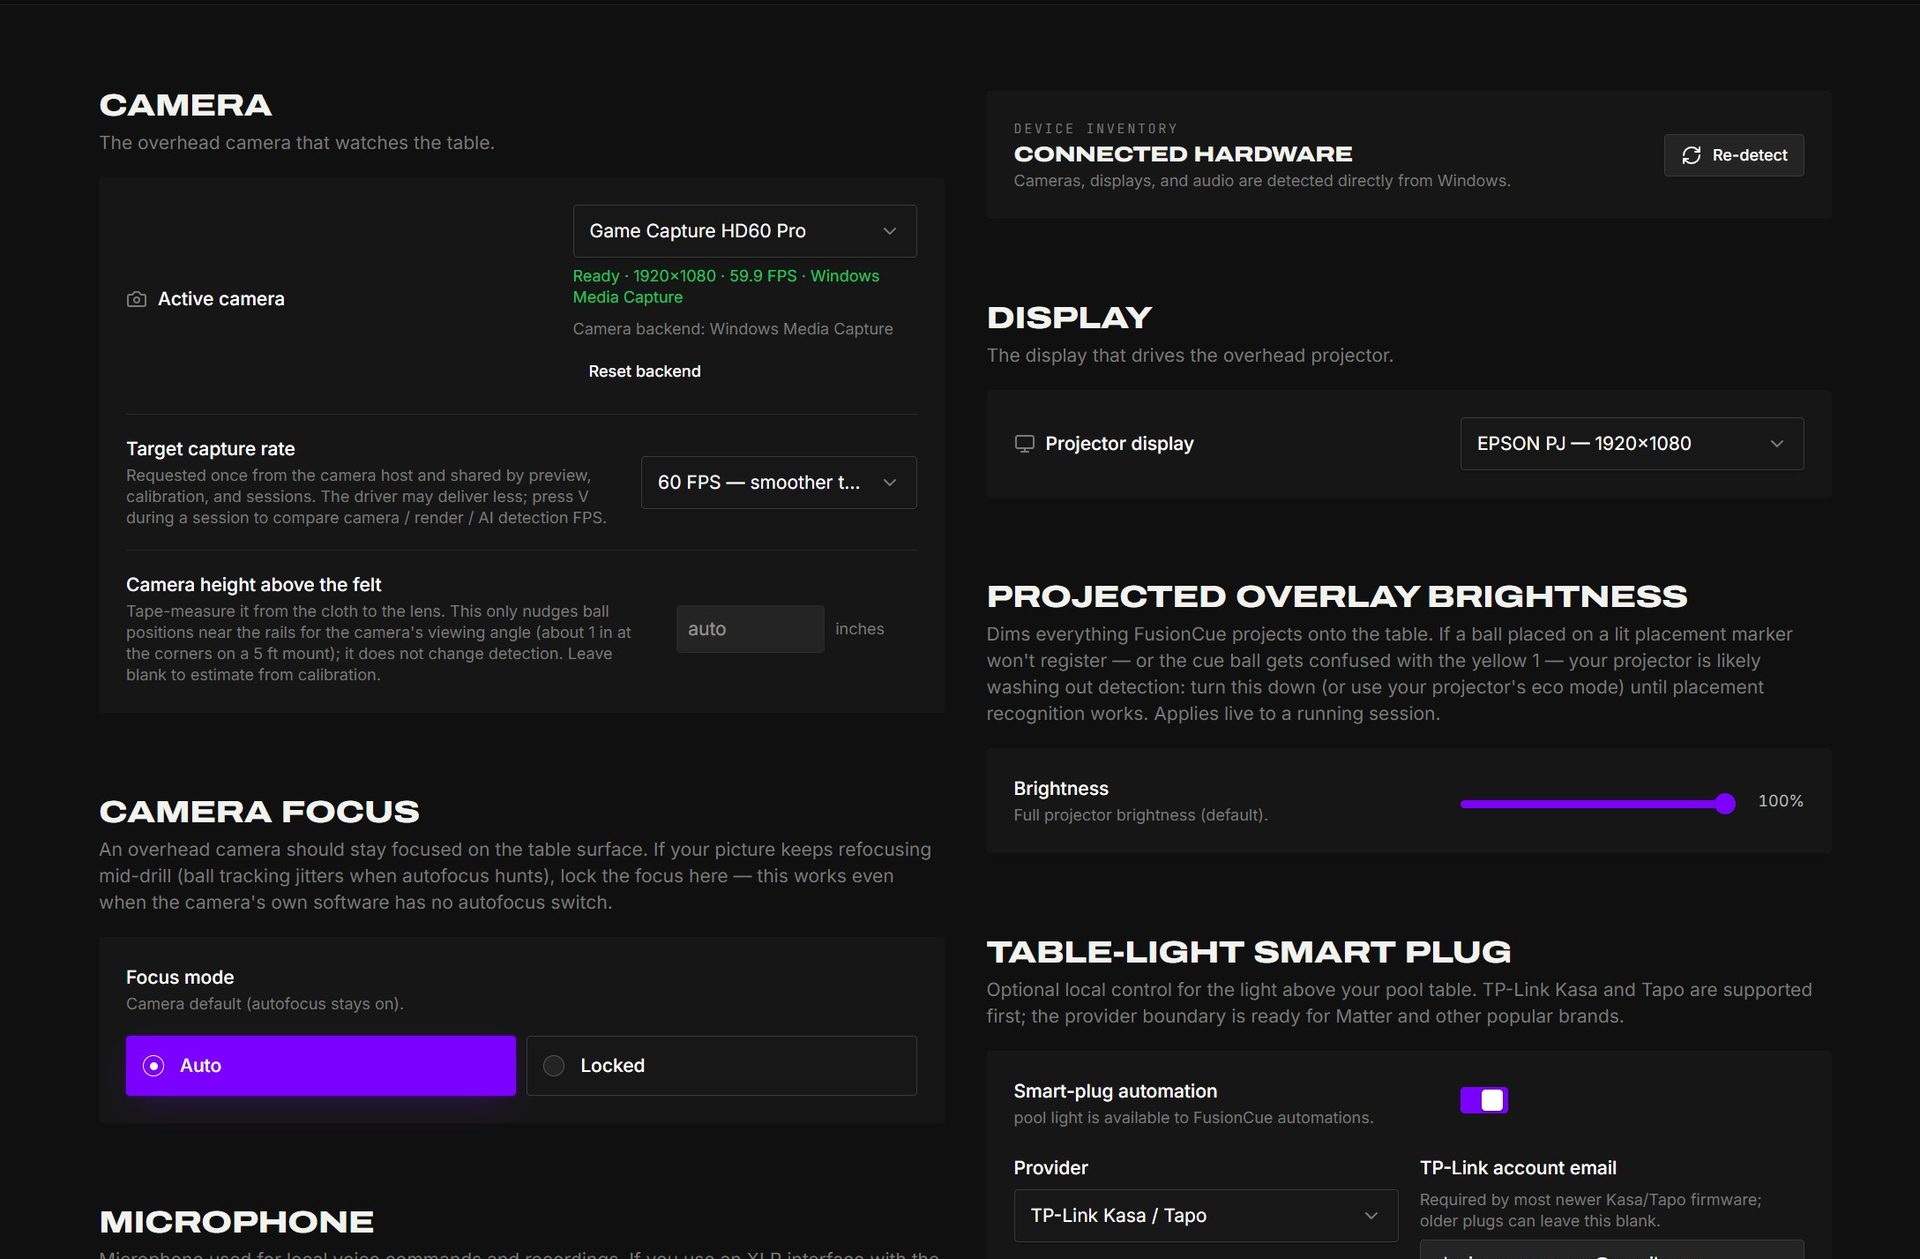 Settings → Hardware is where the camera, projector display, projected brightness, camera focus, smart plug and microphone are assigned.
Step 9 — Calibrate
The hardware is done. Calibration teaches FusionCue where the projector paints and where the camera sees; it takes about ten minutes and Setup help walks you through it in the app.
Start your free trial on the day the camera and projector are mounted, not before — the trial is what unlocks ball tracking, and there is no reason to spend its days waiting for a delivery.
If something is not right
| Symptom | Fix |
|---|---|
| FusionCue finds no camera | Use a blue USB 3.0 port on the back of the PC, the cable that came with the camera, no hub. Try a different port. |
| Camera runs slowly (about 10 fps) | Same as above. Beyond about 10 ft you need an active USB 3.0 extension. |
| Camera picture is black | Turn the table light on and open the privacy shutter. |
| The list shows a laptop's own webcam | That one points at you. Plug in the overhead camera and pick it instead. |
| Projector says No Signal | Choose the right HDMI input with the projector's remote; check optical HDMI direction. |
| Windows shows one screen | Windows key + P → Extend. |
| Picture does not cover the table | Raise the projector. If you cannot, its throw ratio is too long for the room. |
| Picture is upside-down or mirrored | Fix it in FusionCue (rotate or un-mirror) rather than remounting. |
| Projection is faint, even at full brightness | Turn off Windows Night light (Settings → System → Display), including any sunset schedule. It strips blue from the picture, and blue cloth reflects almost nothing else. Then set the projector's picture mode to its brightest, lamp power to normal rather than eco, and keep its own Brightness near the default; raising it greys the black background. Dim room lights help most of all. |
| Placed balls will not register on a lit marker | The projector is washing them out. Lower Settings → Hardware → Projected overlay brightness or use the projector's eco mode. |
| Calibration drifts over days | Something moved. Tighten the camera arm and projector mount, then re-run the affected calibration step. |
Still stuck? Setup help inside the app can see your PC's actual state, and a human is one message away on Discord or at +1 330 550 5143.